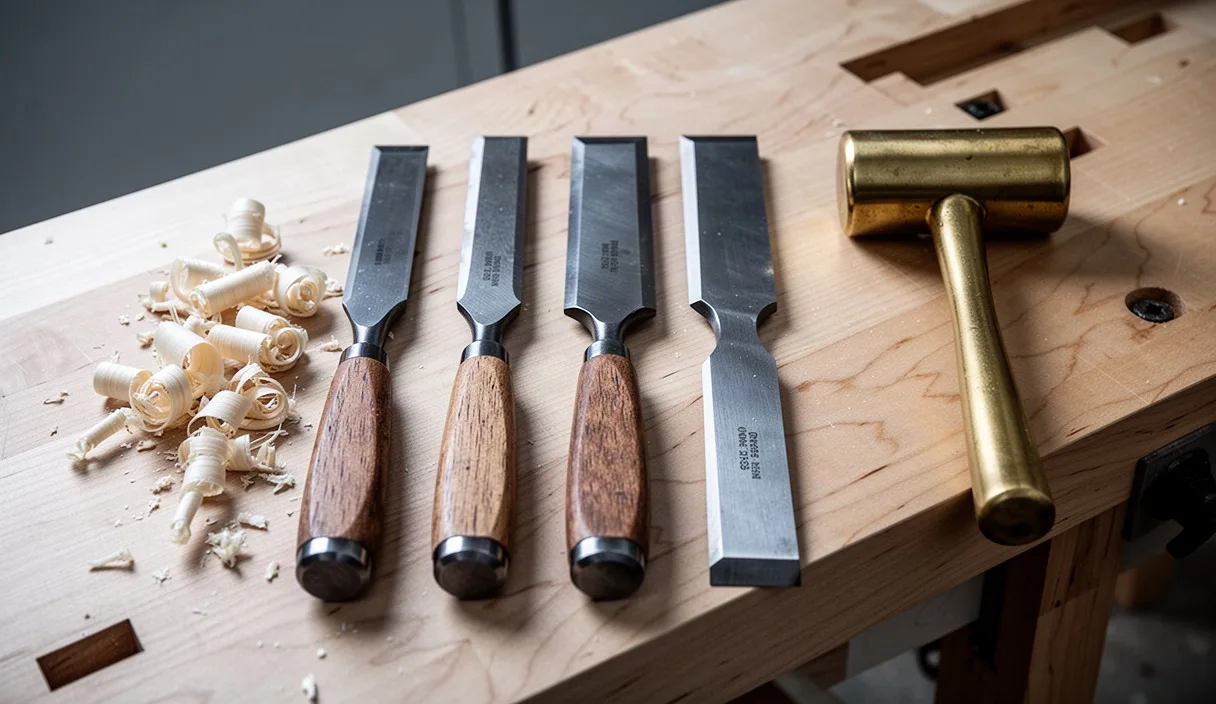

Walking down the hand tool aisle of a hardware store or browsing woodworking catalogs online can be disorienting. You will see four-piece chisel sets packaged in blister packs for twenty dollars, sitting right next to three-piece sets packed in velvet-lined wooden boxes for three hundred dollars. Both look like sharp bars of steel fitted into wooden or plastic handles. When you are just starting your woodworking journey, it is hard to tell whether the expensive set represents genuine quality or simply brand prestige, and whether the cheap set is a bargain or a waste of money.
A chisel is deceptively simple: it is a wedge mounted to a grip. Yet this tool does more work in joinery than almost any other hand tool in the shop. A chisel trims tenons, clears the waste between dovetail pins, pares end grain down to a knife line, and cuts recesses for hinges. Choosing the right first set does not mean buying the most expensive tools on the market. It means understanding the mechanics of how steel cuts wood, choosing a tool construction that matches your working habits, and buying the specific blade sizes that you will actually reach for at the workbench.
What Does a Chisel Actually Do in Grain?
To understand why a chisel needs specific steel and geometry, you must look at how wood is built. Think of a piece of lumber as a tight bundle of dry drinking straws glued together. The straws are wood fibers, running along the length of the board. When you work with wood, you are either cutting across those straws or peeling them apart along their length.
How does a chisel blade interact with these straws? It operates in two entirely different ways depending on the direction of your cut. When you push a chisel parallel to the grain, the blade acts as an inclined wedge. The flat back of the chisel registers against the cut path while the angled bevel levers the wood fiber upward, peeling it away like shavings from a hand plane. This is called paring. If your blade is dull, it will not peel the straw cleanly. Instead, it will crush the fiber ahead of the cut and follow the natural grain line down into your project, tearing out chunks of wood below the depth you intended.
When you cut across the grain, the chisel acts like an axe or a guillotine. The cutting edge must sever thousands of tubular fibers simultaneously. If the blade lacks a keen edge, the straws will bend, buckle, and tear out along their walls rather than slicing cleanly. Chopping joinery waste out of a mortise, which is a deep rectangular pocket cut into a piece of wood to accept a matching tongue, requires substantial downward force. The edge must sever the fibers cleanly at the boundary line while withstanding the blunt shock of a mallet blow without chipping.
Tang versus Socket Handles Explained
Wood chisels transfer force from your hand or mallet directly into the timber. Over centuries of toolmaking, makers settled on two primary methods to connect the steel blade to its wooden handle: the tang design and the socket design. The difference comes down to whether the steel enters the wood or the wood enters the steel.
A tang chisel features a pointed steel spike, called the tang, that projects backward from the blade shoulder. This metal spike is pressed into a pre-drilled hole inside the wooden handle. To keep the handle from splitting when you strike it with a mallet, the manufacturer presses a metal ring, called a ferrule, over the base of the wooden handle. Tang chisels are common in Western cabinetmaking shops. They balance well in the hand because the center of gravity sits closer to your fingers, making them comfortable for delicate paring operations where precision matters more than brute force.
A socket chisel flips this arrangement. The steel blade ends in an open, conical metal cup. The wooden handle has a matching cone carved into its lower end, which seats directly into the metal socket. Why does this design matter for heavy work? Physics is on your side with a socket. Every time you strike the top of a socket chisel with a heavy wooden mallet, the downward impact drives the wooden handle deeper into the metal cone, wedging it tighter. In contrast, heavy mallet blows on a tang chisel constantly drive the metal spike deeper into the handle core, which can eventually split the wooden handle lengthwise over years of heavy chopping.
| Feature | Tang Handle | Socket Handle |
|---|---|---|
| Connection Type | Pointed steel spike enters wood handle | Wooden cone fits into steel blade cup |
| Best Use Case | Delicate paring, fine trimming, light joinery | Heavy chopping, mortising, framing work |
| Balance | Even weight distribution near the blade | Slightly handle-forward or heavier overall |
| Handle Replacement | Requires drilling and precise ferrule fitting | Can be turned on a lathe and friction-fit in minutes |
| Climate Sensitivity | Handle stays put regardless of humidity | Handle may drop out if wood shrinks in dry weather |
One trade-off of the socket design is seasonal humidity change. If your workshop becomes very dry in winter, the wooden handle can shrink slightly and slide out of the socket when you pick the tool up. You can easily fix this by placing a small piece of paper in the socket or tapping the handle firmly against the workbench, but it is an operational quirk that tang chisels do not have.
Steel Types: High Carbon versus Chrome Vanadium
When you read the packaging on a chisel set, you will inevitably encounter metallurgical terms. The two most common steel categories found in entry-level and mid-range chisels are high-carbon steel and chrome vanadium steel, often abbreviated as Cr-V. Understanding these alloys helps you balance how long a chisel stays sharp against how difficult it is to re-sharpen once it becomes dull.
High-carbon steel contains iron alloyed with roughly 0.8 percent to 1.2 percent carbon, with few other metals added. Toolmakers often designate these steels as O1, meaning oil-hardening, or W1, meaning water-hardening. The greatest benefit of high-carbon steel is its grain structure. Under a microscope, high-carbon steel has a uniform, fine grain that allows you to grind and polish an edge down to an astonishingly thin, sharp apex. It sharpens quickly on basic oilstones or waterstones. However, it rusts easily if left in a humid garage, and it can chip if you strike an unexpected nail or hit a dense knot at an aggressive angle.
Chrome vanadium steel contains chromium and vanadium additions that increase the metal toughness and hardenability. Most mass-produced European and American chisels sold in big-box home improvement stores use Cr-V steel. What makes Cr-V attractive for a beginner? It is durable. If you accidentally pry a piece of wood sideways while cleaning out a mortise, a Cr-V blade will usually bend slightly or resist breakage where a brittle high-carbon blade might snap. It also resists surface rust much better than plain carbon steel. The downside is that Cr-V steel can feel slightly gummy on fine sharpening stones, and it rarely takes the razor-sharp mirror edge that high-carbon steel achieves with the same effort.
Chisel hardness is measured on the Rockwell C scale, often written as HRC. Quality woodworking chisels usually sit between 58 HRC and 62 HRC. Steel softer than 58 HRC will roll its cutting edge over after only a few mallet strikes in oak or maple. Steel harder than 62 HRC will hold an edge for a long time, but it becomes brittle and requires specialized diamond stones or ceramic plates to sharpen efficiently without chipping.
The Four Essential Widths to Buy First
Chisel sets are frequently sold in large kits containing six, eight, or even twelve tools. While having a large rack of matching wooden handles looks impressive above a workbench, beginners rarely use more than four core sizes during their first few years of building furniture. You can save money and invest in higher-quality steel by buying a smaller set or purchasing individual blades.
The four workhorse sizes every woodworker should own are:
- 1/4 Inch (approximately 6 millimeters): This narrow blade is your primary tool for clearing waste from tight joinery. It fits comfortably inside the baseline of narrow hand-cut dovetails and cuts the small mortises used in cabinet door frames. Because the blade is thick relative to its narrow cutting edge, it handles heavy mallet strikes without flexing.
- 1/2 Inch (approximately 12 millimeters): The single most versatile chisel in the shop. A half-inch blade is wide enough to balance securely across narrow stock, yet narrow enough to clear the waste from typical mortises cut in 3/4-inch lumber. If you could only bring one chisel to a job site, this would be the size to pick.
- 3/4 Inch (approximately 19 millimeters): This width excels at paring tenon shoulders and trimming lap joints. When you cut a tenon, the flat face must seat flush against the mating mortise. A 3/4-inch blade spans enough surface area to bridge high spots, preventing you from accidentally dishing the wood fiber during cleaning.
- 1 Inch (approximately 25 millimeters): The wide blade functions like a miniature hand plane. Its broad cutting edge makes it ideal for trimming dowels flush, cleaning up glue runs, leveling wide joints, and paring chamfers along the edges of tabletops. Its width prevents it from diving deeply into the grain, giving you exceptional control when working by hand pressure alone.
Sizes narrower than 1/4 inch, such as 1/8 inch, are specialty tools meant for delicate inlay or miniature boxes. Sizes wider than 1 inch require immense mallet force to drive through hardwood and are difficult to push cleanly by hand. Start with these four core sizes, and only buy specialized widths when an actual project drawing calls for them.
Initial Tuning: Flattening the Back on Sandpaper
There is a widespread misconception that a brand-new chisel comes out of the factory ready to cut wood. In reality, almost every chisel requires initial setup, often called tuning, before its first use. A sharp cutting edge is formed by the intersection of two distinct planes: the bevel face and the back face. If either of those surfaces is rough, pitted, or curved, the two planes cannot meet at a crisp line, and the tool will never be truly sharp.
Factory grinding leaves microscopic ridges on the back of a new chisel. Worse, stamping and heat-treatment processes often leave the back slightly twisted, bowed, or hollow. You can flatten the back of your new chisels using the scary-sharp method, which relies on sheets of wet-and-dry automotive sandpaper adhered to a dead-flat reference surface like a piece of float glass or a polished granite inspection tile.
Securing the Flat Reference Plate
Place a piece of 3/8-inch or 1/2-inch thick float glass or a flat granite offcut on your workbench. Put a rubber drawer liner or a damp towel underneath the plate so it cannot slide during work. Cut strips of wet-and-dry silicon carbide sandpaper in grits of 220, 400, 800, 1500, and 2000. Spray a light mist of water or a quick pass of repositionable spray adhesive on the glass, then press the 220-grit paper down smoothly, rolling out any air bubbles with your fingers.
Establishing the Scratch Pattern
Lubricate the sandpaper with a splash of water mixed with a drop of dish soap. Place the back of the chisel flat against the paper. You do not need to flatten the entire length of the blade, only the first two inches closest to the cutting edge. Apply firm, downward finger pressure directly over the front portion of the blade, keeping your hand balanced so you do not tip the tool onto its side or round over the nose. Move the chisel back and forth along the paper for roughly thirty strokes.
Inspecting the Contact Area
Wipe the blade clean with a rag and inspect the metal surface. The areas touching the sandpaper will appear dull and gray with uniform scratches, while low spots will remain shiny from the factory grinding. What are you looking for? You need a solid band of uniform scratches extending all the way across the cutting edge, reaching at least one inch back from the tip. If the center is shiny while the sides are gray, the chisel is hollow; this is acceptable as long as the scratches connect continuously across the cutting edge itself. If the edge is shiny while the center is gray, the chisel is bowed, and you must continue working on the 220-grit paper until the scratches reach the cutting line.
Progressing Through the Fine Grits
Once the 220-grit scratch pattern forms a continuous line across the edge, move to the 400-grit paper. Wash the blade thoroughly before changing grits so you do not carry coarse grit particles onto the finer sheet. Work the back back and forth until the deeper 220-grit scratches are completely replaced by the finer 400-grit pattern. Repeat this process through 800, 1500, and 2000 grit. By the time you finish on the 2000-grit paper, the first two inches of the chisel back should look like a mirror. You will only need to perform this heavy flattening process once in the lifetime of the chisel; regular maintenance afterward requires only a few passes on a fine polishing stone or leather strop.
Common Mistakes
New woodworkers often unknowingly damage their chisels or struggle with poor cutting performance due to a few common handling habits. Being aware of these pitfalls will keep your tools in prime working condition:
- Using the chisel as a pry bar: A chisel is designed to slice fibers under forward compression. Prying wood chips sideways or levering stubborn mortise waste out using the blade tip places massive bending stress on the hardened steel, which often results in chipped corners or a snapped blade.
- Sharpening only the bevel: Many beginners spend hours polishing the angled cutting bevel while completely ignoring the flat back. If the back has a burr, which is a bent flap of microscopic metal pushed backward by sharpening the bevel, the chisel will tear wood rather than slicing it cleanly.
- Striking wooden handles with a steel claw hammer: Driving a chisel with a standard carpenter hammer will rapidly mushroom, split, and destroy a wooden handle. Always use a dedicated wooden mallet, a dead-blow urethane mallet, or a brass-headed joinery mallet.
- Overheating steel on high-speed bench grinders: If you use a high-speed dry mechanical grinder to reshape an edge, you can quickly overheat the thin tip. If the steel turns blue or purple, the heat has ruined the temper, making the steel soft and incapable of holding an edge until the discolored section is ground away entirely.
Practical Next Steps
To begin building your joinery toolkit, look for an entry-level set of four chisels (1/4 inch, 1/2 inch, 3/4 inch, and 1 inch) made by a reputable manufacturer from high-carbon or chrome vanadium steel with beveled edges. Avoid sets that feature flat, rectangular carpenter edges along the sides, because thin bevel edges are necessary to fit inside the tight corners of dovetail sockets.
Pick up a flat piece of scrap plate glass, a multi-pack of wet-and-dry sandpaper ranging from 220 to 2000 grit, and a simple wooden mallet. Spend your first afternoon in the shop tuning the backs of the blades using the sandpaper method described above. Once the backs are flat and reflective, practice making thin, shaving-like paring cuts across the end grain of a soft pine scrap board. When your chisel can slice cleanly through soft pine end grain without crushing the wood fibers, you will know your tools are sharp, tuned, and ready to tackle real joinery.